
The Huntress ServiceNow integration is used to send notifications from Huntress to ServiceNow. It is a one way sync between the Huntress Portal and ServiceNow which creates ImportSets. These ImportSets are then used to transform that data into Incidents or whatever else customers require within their ServiceNow setup. We took this approach since ServiceNow is highly customizable and many partners have different requirements and approaches to customer and incident management.
Here’s how to set it up:
On the ServiceNow side we’ll need to create:
- A new ImportSet table which the Huntress Integration will be pushing to
- A TransformMap which will turn the data from the ImportSet into an Incident
- An API-only user for the Huntress Integration
- An API Key connected to the newly created Huntress User
On the Huntress side we only require the ServiceNow instance ID, an API Key and the name of the ImportSet table we’ll create in these instructions.
Prerequisites:
- The API Key and HMAC Authentication plugin which comes as default. It should already be installed but if for some reason it isn't you can install it for free.
Step 1: Set up the ImportSet table in ServiceNow
- In the navigation pane, search for "System Definition" and click on the "Tables" module.
- On the "Tables" page, click on the "New" button to create a new table.
-
Fill in the following information in the form:
- Name: u_huntress_incidents
- Label: Huntress Incidents
- Extends table: Select "Import Set Row" from the dropdown list.
- Make sure Create Access Controls under Controls is checked:
-
Allow Access to this table via web services" in the "Application Access" tab
- Click on the "Submit" button to create the Import Set table
- Once table is created, navigate to the table then create the new columns that will come from Huntress:
- Map the columns like so, we’ll need organization name, severity, short description, description, Entity ID, Entity Status, Entity Type and URL:
- Click on Update
Step 2: Create a TransformMap to turn the import data into an Incident
- In the navigation pane, search for "transform map" and click on the "Create Transform Map" under System Import Sets:
- Create the transform map by filling out the following:
- Name: huntress_incidents_to_service_now_incidents (This can be whatever you choose, this is just an example)
- Source Table: The name of the ImportSet table created in the previous step
- Target Table: Incident
- Click on Submit
- Navigate to the newly created Transform Map table
- Click on Auto Map Matching Fields which should map 3 fields:
- Click on Update
You can also write your own transform script if you want to support more complicated setups. We’ve included the huntress organization name, entity id, entity status and the URL which may help facilitate custom logic. This is out of scope for the basic huntress integration.
At this point the ServiceNow instance is set up with the import table and the logic to transform that data into incidents. The next step is to create a way for the Huntress Integration to post to the newly created ImportSet table. We’ll use an API key for this:
Step 3: Creating an API Only user within ServiceNow
The integration requires an API Key which needs to be associated with a user within ServiceNow so the first step is to create that user and give it the correct permissions.
- Go to your ServiceNow instance and go to the Users page under System Security
- Click on New in the top right hand corner
-
Fill out the User ID:
- Navigate back to the Users page and click on the newly created user
- Scroll down to the Roles section and click on Edit
- Add the following roles and click on Save. We want this user to be able to do CRUD actions on incidents and post to the newly created ImportSet table. That role may be different based on what the incidents table was named. In the example the table is called u_huntress_incidents:
Step 4: Create an API Key connected to the newly created user
We’ll now need to create the key the integration will be using. In order to do that we’ll need to set up an Inbound Authentication Profile, an API Key, and an API Access Policy. This is pretty much verbatim from these instructions from ServiceNow.
Step 1: Set up the Inbound Authentication Profile: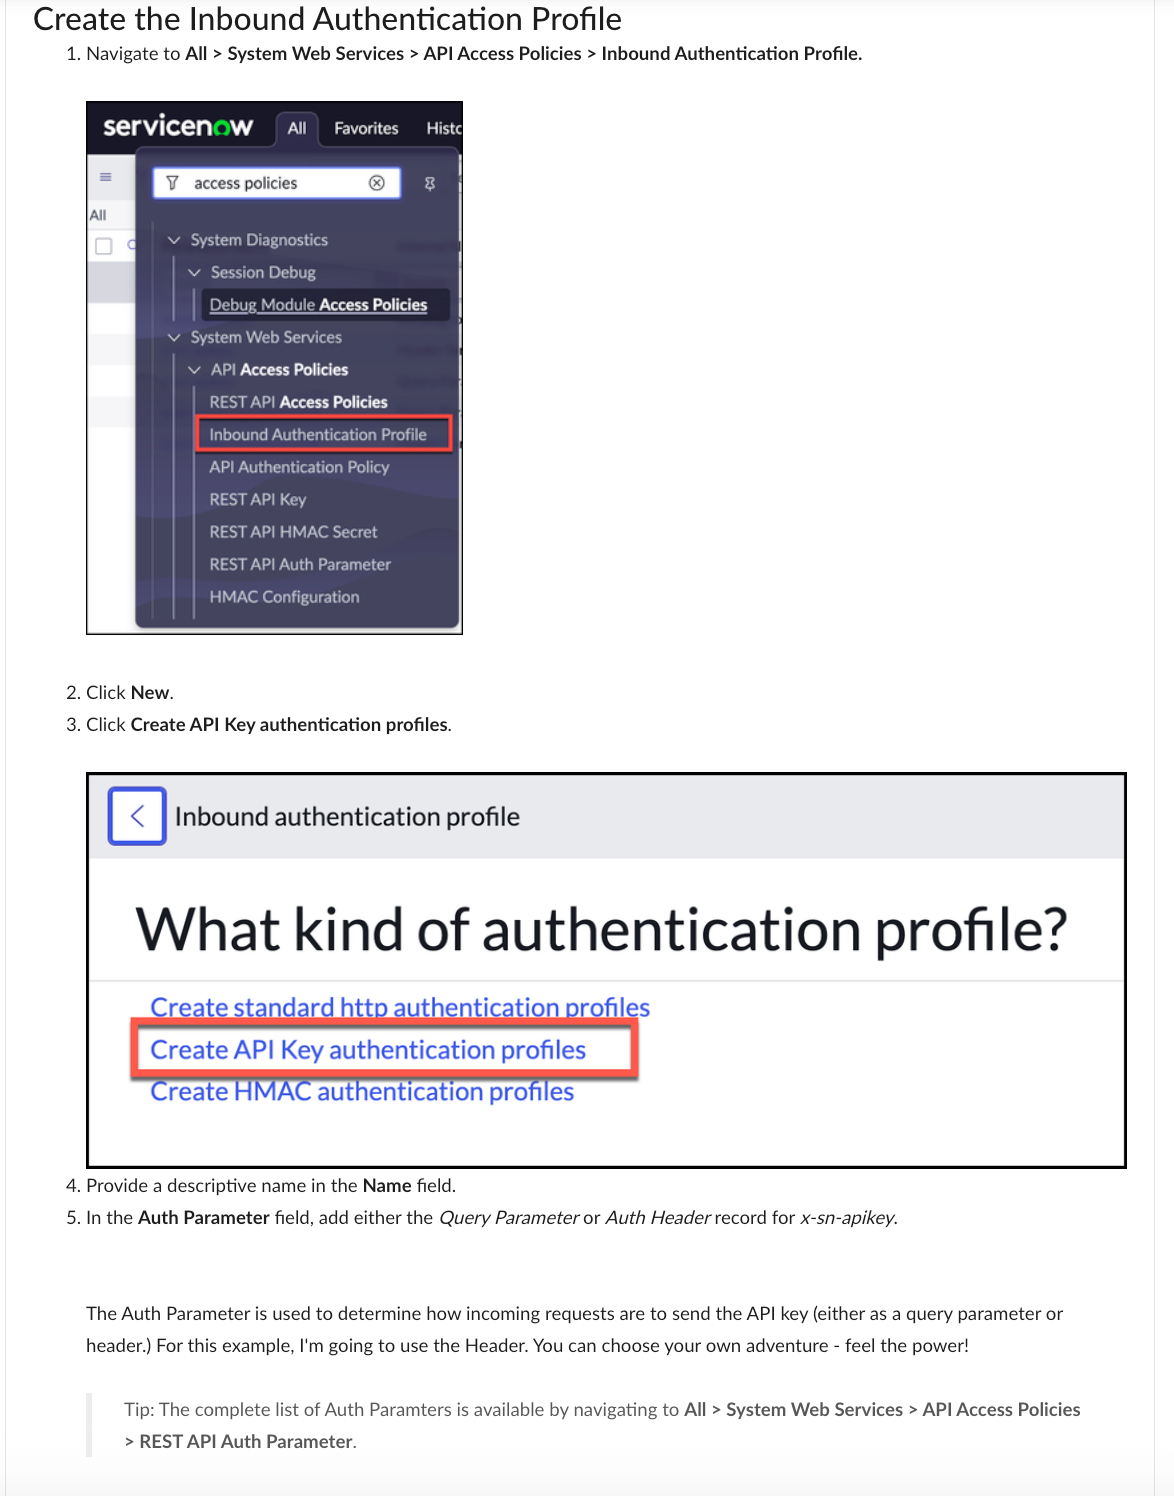
Huntress uses the Authentication Header parameter.
Step 2: Create the REST API Key
When creating this key we’ll associate it with the user we created earlier
Step 3: Create the API Access Policy
And here are the instructions:
- Navigate to REST API Access policies
2. Create a new API Access Policy:
3. Make sure to select Table API, REST API PATH should be "now/table", check "Apply to all methods" and "Apply to all resources":
4. Click on the Tables lock icon and select the following tables:
5. Add the newly created authentication profile:
6. When finished your screen should appear like the following:
Step 6 Create the ServiceNow integration in Huntress
Navigate to the integrations page in your Huntress portal and click add then click on ServiceNow
- Fill out the form with your instance ID as well as the API token from the Key we previously made within ServiceNow and then click Add
- Put in the name of your ImportSet table and click Save
- Navigate to the Integrations list
- Click the dropdown menu and click on Send Test Ticket:
Reference Docs:
Setting up SNOW API keys for inbound requests